Setting Up Squeezebox Touch Server
From SqueezeboxWiki
The process for setting up your Squeezebox Touch to be a Server is comprised of these steps:
- Configure music library hardware
- Attach music library
- Start Server and wait for initialization to finish
- Touch now ready as a Server
Contents |
Step 1: Configure Music Library Hardware
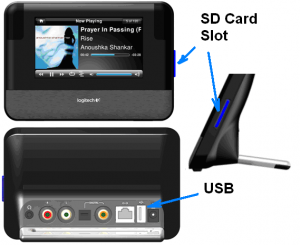
The Squeezebox Touch will play tracks from a wide variety of USB or SD card storage devices.
- USB hard drive
- USB flash drive
- SD card of capacity 32GB or less
USB Storage
You can use USB hard drives or flash drives in a large range of capacities. Lower capacity USB hard drives of 40GB, and up to 2TB capacity have been successfully tested.
Types of USB Hard Drives
USB drives are either:

- Self-powered -- powered by its own AC adapter. Plug it directly into Touch. You must use the AC adapter supplied with a USB hard drive.
- USB-powered -- derive their power from the USB bus itself. They generally are sold without an AC adapter or with an optional AC adapter (usually not included). Typically marketed as notebook USB drives.
For a list of some of the tested USB devices see USB Compatibility.
Connecting USB-Powered Drives
The Squeezebox Touch conforms to USB specifications, and does not supply more current than this spec. If your USB-powered hard drive intermittently requires more power than the USB specification, it might fail to run properly when connected to the Squeezebox Touch. A self-powered USB hub can supply this additional power. Why? This supplies the hard drive with more power than Touch can provide.
When looking for suitable USB hubs, look for ones that include an AC adapter.
Step 2: Attach Music Library
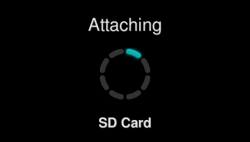
Plug in the USB storage or SD card with your music library. You can attach USB storage or SD cards with the AC power cord for Squeezebox Touch either plugged or unplugged.
Attaching USB Storage
- If AC-powered USB drive
- Attach AC power cord for USB drive and plug in adapter into AC power source
- Attach USB cable to USB drive
- If USB-powered USB drive
- Attach AC power cord for USB hub and plug in adapter into AC power source
- Attach USB cable to USB drive and plug other end into USB hub
After performing the above steps, plug in the other end of the USB cable to Squeezebox Touch
Inserting an SD Card
- Insert the SD card into the slot at the side of the Touch. The label side faces toward you, and the edge with contacts are closest to the Touch.
- Push it all the way in until you hear a click and the card locks into place.
Step 3: Wait for Startup Sequence to Finish
Built-in Server Turns ON When Device Attached
Once you attach the device containing your music library, the built-in server for Squeezebox Touch turns ON automatically and starts up.
Immediately After Attaching Device
It will first scan all directories or folders on the device for music tracks. The following screen shots illustrate this process and provide further details on available choices.
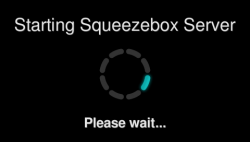
Squeezebox Server Successfully Started -- IMPORTANT NOTICE Screen

When this screen appears, Squeezebox Server has successfully started and is now scanning your device for music tracks and album art. You can choose one of these options:
- Go to Home menu
- See scanning status of Squeezebox Server
- Eject the device you just plugged in.
Wait for Initialization to Finish Before Using Server
Although you can use the Squeezebox Touch (I.e., navigate menus, play tracks, listen to Internet radio, etc.) during the initialization process, the Touch will appear slow to respond during this process. In general, it is best to wait until the initialization has finished before using the Touch.
Initialization and Scanning Progress Screens
When you choose option 2 Squeezebox Server Status, you can watch this process progress and finish.
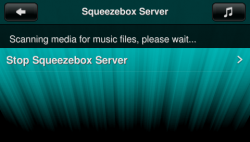
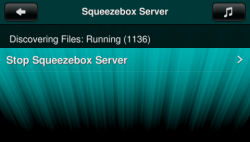

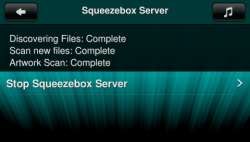
This process takes longer when you have more tracks and album art covers in your music library.
Step 4: Startup Finished -- Server Now Ready
After initialization finishes, you can use it like any Squeezebox Server as a music server for up to two other Squeezebox players.
Powering Squeezebox Touch OFF
A Squeezebox Touch with an attached USB hard drive can be left powered ON continuously. If you wish to turn Squeezebox Touch OFF, you must follow this sequence:
- Stop Squeezebox Server by going to
Settings->Advanced->Squeezebox Server->Stop Squeezebox Server - Unplug power cord from Squeezebox Touch
Powering Squeezebox Touch ON
When powered ON with a previously initialized USB hard drive or SD card, the Squeezebox Touch Server will automatically start. It will rescan the attached USB or SD device for new and changed items in your library before resuming normal operation.
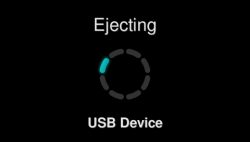
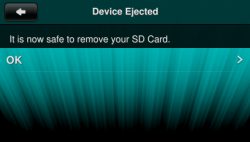
Removing the USB Device or SD Card
Before removing a USB device or SD card, you must eject the device before disconnecting it from Squeezebox Touch. Go to the home menu and choose the appropriate Eject option. When you are instructed to remove the card, do so by pressing the card toward the Touch. The card will unlock and spring out from the slot. Grab the card and pull it out of the Touch.