EAC Ripping
From SqueezeboxWiki
Beginners Guide to Ripping using EAC
What EAC Does
Generally, EAC will extract the CD tracks to WAV files, then call an external encoder to encode the files. The external encoder is often a command-line encoder - you can have it pop up if you wish to track its progress. When the encoder is finished, the WAV is deleted - you can disable this but there's no need to if you're encoding to a lossless format.
The ripping and encoding processes are entirely separate. Therefore EAC can still be ripping while the encoder is working, or EAC can have finished ripping the disc while the encoder is still running. In fact, if you have set EAC to automatically eject the disc after ripping, you can load another disc while the encoder is still running. Note that you can set EAC to rip everything, then start the encoder, or start multiple encoder instances. Since EAC doesn't significantly load the processor, you can safely run at least one compressor instance while EAC is ripping. Running more than one compressor instance heavily loads the processor and is not recommended, but you can do this, see EAC - EAC Options - Tools - "On extraction, start external compressors queued in the background", followed by the number of external conmpressor instances allowed.
While the encoder is still running, the filenames and files in the directory where the encoded files are being written will not be accurate. There may be temporary WAV and compressed files with bizarre names. Do not delete them or attempt to load them. They are incomplete and loading them may interrupt the compression process.
Now that you have completed the arduous task of installing and configuring EAC, its time to sit back and enjoy the ease-of-use of a properly setup EAC:
- Find a CD that you want to rip.
- Make sure the bottom surface of the CD is clean. Look for fingerprints, dust, dirt and scratches. If you find any, clean the bottom surface of the disc with a microfibre cloth and glass cleaner or 50% isopropyl alcohol / 50% water mix. Always wipe in a straight line from the centre of the disc to the edge, never in a circle along the circumference of the disc. If the disc is clean but scratched, a cleaning will assist your drive in reading the data correctly. If the disc is clean and undamaged, it is not recommended to clean it as cleaning may cause slight wear and scratches on the disc.
- Insert the CD into the drive. You may wish to open EAC and only load the disc with EAC running. When EAC is running, it defeats autorun, ensuring that any computer program on the CD is not automatically loaded onto your PC. You should also disable autorun in Windows for the drive, but this is a double assurance. Once loaded, EAC tries to locate artist, track and album names from freedb. If it’s a common CD then it should be automatically found in the freedb database. If not you’re going to have to enter all the information yourself.
- It’s a good idea to do a quick review of the metadata (tags) including: track names, album title, artist, year and genre. It is much easier to fix these tagging issues now than later. Press F2 to edit track names.
- You may wish to detect gaps by pressing F4. See here for more info.
- Now you can begin ripping by clicking on the MP3 icon on the left hand side of the interface. This doesn’t mean that you’ll be ripping to MP3 just that it will use the external compressor (in your case FLAC) to encode the tracks.
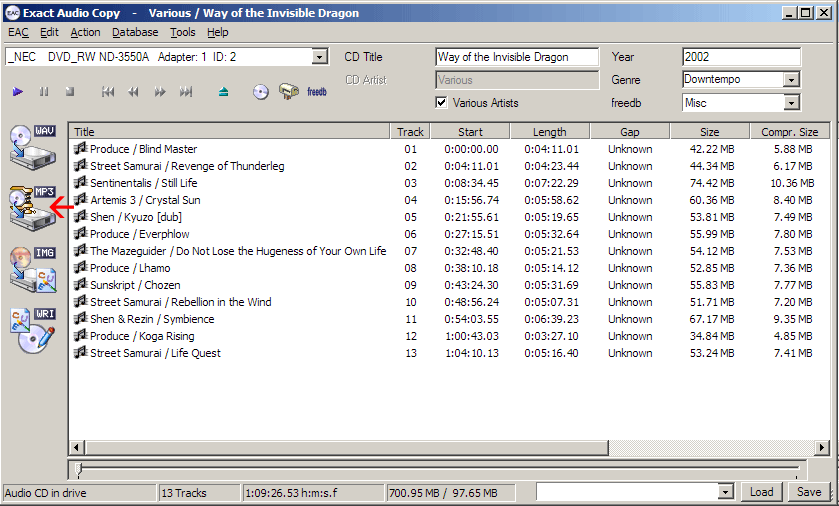
- If you’ve select to be asked about which directory to rip to, EAC will now ask you for a directory. Create one as necessary.
- Once you’ve created your directory and opened it in the dialog box, click the Save button (you don’t have to worry about filling in the filename field).
- Now ripping will begin and you should see a screen like this:
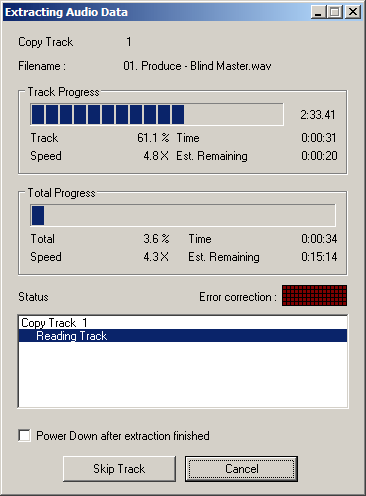
- EAC will take longer than many other ripping programs (because it's being more accurate) so sit back, grab a beer and wait. If you run into a track that is generating errors (shown by red dots in the Error Correction box) that EAC is getting really stuck on, you can try going into your Drive Options and turning C2 Error Correction On (if supported by your drive). Make sure that you listen to track after its ripped to ensure that there is no audio problems. If the problem persists then you may have to Skip the track and try to find another copy of it.
- Once extraction is finished you should see something like this:
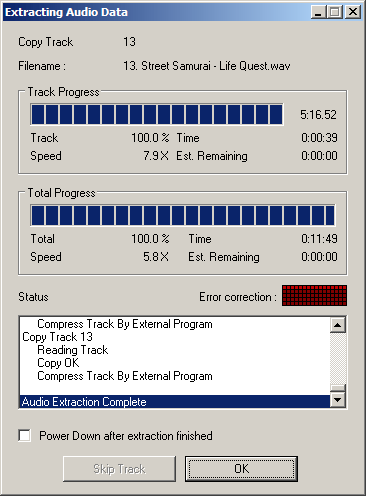
This screen doesn’t tell you much about your rip except that its finished. Click OK. - The next screen that comes up tells you a little more. The important line here is “No errors occurred”. Disregard the Track Quality line for each track, you can still achieve an accurate rip even if the quality of the rip is below 100%.
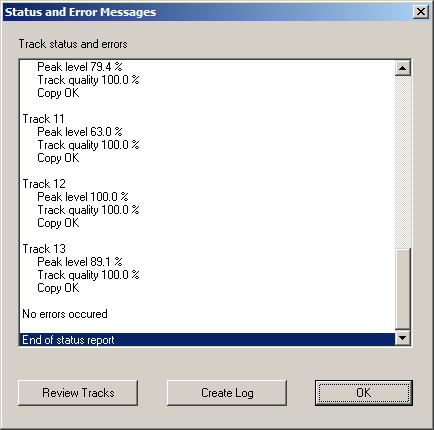
If errors have occurred you can see which tracks generated them by scrolling up through the list. If you wish to save this screen as a log to use for step 14, press the "Create Log" button. - If you have AccurateRip setup (see EACInstall) and this CD is recognized by the program you may see an AccurateRip screen. The number in brackets next to each track shows the number of other people who have had identical rips to your own. If there is an inconsistency between your rip and others rips you will see it here. Personally, I don’t tend to worry too much if a small number of people disagree with my rip… if the number is large then its time to consider cleaning and re-ripping the CD.
- If there were errors, listen to the tracks at the error positions noted by EAC. Use headphones so you can very precisely listen to the track for ticks, clicks, pops or dropouts. 95% of the time you will probably not notice any errors. 4% of the time you may hear a slight tick in one channel. 1% of the time you may experience a dropout.
- If there were audible errors or if you're determined to get an accurate rip no matter how long it takes, you may wish to use a CD repair kit. But first, hold the disc up to a light. If you can see light through scratches and specs in the aluminum layer, you cannot repair those sections. Re-rip those tracks in WAV and use EAC's glitch and pop removal tools. If the aluminum layer is intact, the glitches are caused by scratches. You will probably be able to guess which scratches are causing the errors. A CD is read from the centre to the edge, so from this you can guess where each track is located, and a defect causing an audible error will almost always be visible. On many older discs, you can see the data itself, visible as a dull area - it may not go right to the edge. See here for more information.
- Re-rip the repaired tracks (possibly with C2 Error Correction On, see step 17 of the EAC Install Guide for more info). 95% of the time the track will re-rip without errors. 5% of the time the errors will be reduced. It's very rare to have an audible artifact remain, but if it does, re-rip the track in WAV and use EAC's glitch and pop removal tools.
Congratulations! You can now rip as many CDs as you wish by using the same method!
If you are interested in adding ReplayGain (basically making all your tracks play at the same volume) go on to step three Adding ReplayGain using Foobar2000