Beginners guide to installing EAC
From SqueezeboxWiki
DISCLAIMER: EAC is a powerful tool with hundreds of options. No two people will have exactly the same setup or preferences. These preferences produce accurate rips with undamaged and damaged discs, and even if a track has an error, it is usually inaudible. This arrangement strikes a balance between speed and accuracy, leaning more towards accuracy, so don't expect fast rips on damaged discs.
The good news is that you only have to do all this once and then save it!
For more information on why these options were chosen see the related Hydrogen Audio thread
1. Installing EAC should be straightforward using the built-in installer.
a) If you are installing EAC V0.99 and up you can skip steps 2, 3, and 4, because they are included with EAC. Discussion of change log here: http://www.digital-inn.de/exact-audio-copy-english/36596-eac-0-99-pb4-released.html
2. Install the AccurateRip software.
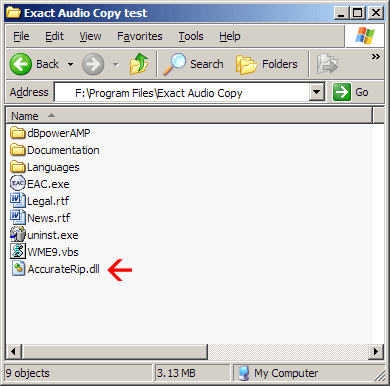
3. Once AccurateRip is installed, you need to copy accuraterip.dll from AccurateRip's install folder (typically C:\program files\illustrate\dbpoweramp\) to EAC's install folder (typically C:\program files\Exact Audio Copy\)
4. Then install Flac from the installer. If you don’t want WinAmp installed, select No. Otherwise installation should be straightforward.
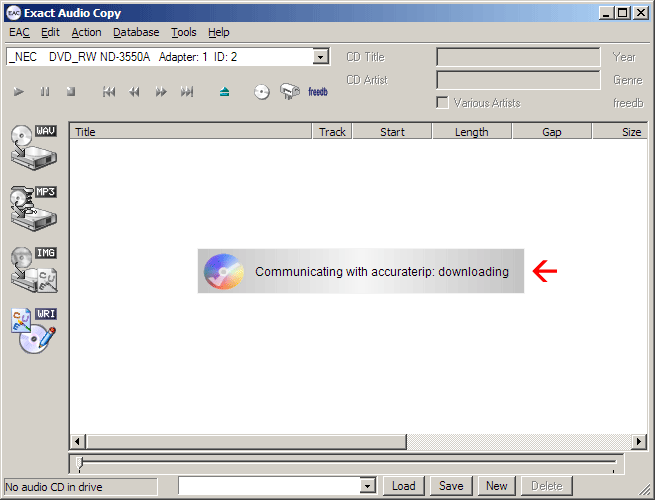
5. Now startup EAC, if you have installed AccurateRip correctly (see step 3) then you should see something like this:
6. You must configure AccurateRip by inserting three CDs that are known to AccurateRip. Here is a description of the process from the AccurateRip website:
/"Before AccurateRip can be used it must find the correct read offset for your CD drive(s), read offset what is that? every CD drive has a slight reading offset, this value tends to be fixed for each type of drive and is constant (if the drive does not support AccurateStream, ie it has a varying offset each time a track is read then AccurateRip cannot be used, it will never configure). AccurateRip will find the drive offset by using keydiscs, a key disc is a CD someone else has ripped (with a configured read offset) the CD must have more than 5 tracks of a certain length. To configure AccurateRip insert known keydiscs into your CD Ripper (a list of keydiscs is on www.accuraterip.com) if it is recognized (there are many different pressings of the same CD, each pressing is totally different) AccurateRip will automatically offer to find the drive offset."/
7. Once you have found three CDs that AccurateRip already has in its database, AccurateRip will automatically setup your Read Offset within EAC.
8. Now its time to go into EAC's options, in the EAC menu select EAC Options. On the Extraction tab you should see the following options:
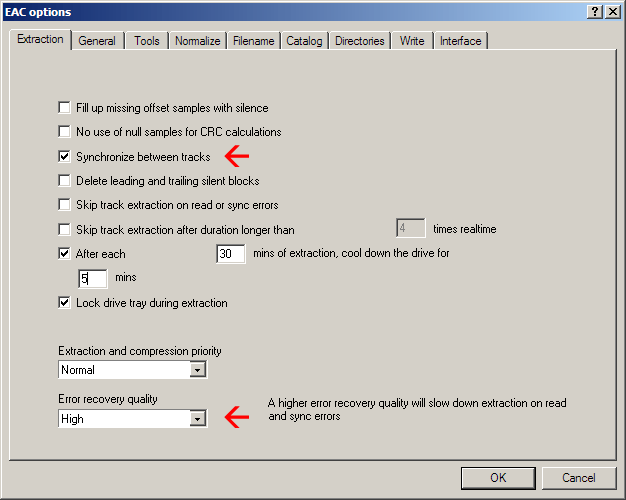
NOTE: if you experience trouble with errors on every track, you may want to experiment with the "Fill up offset missing samples with silence" setting. See here. Also AccurateRip requires either this option or the Drive Option "Overread into Lead-In and Lead-Out" to be enabled for it to show AR results after extraction is complete.
Setting up as shown above will be fine in most situations. If you never want to copy tracks with errors in them then go ahead and check Skip track extraction on read or sync errors and also Skip track extraction after duration longer than.
9. The General Tab has no effect on your final rip, it simply changes the way EAC works. Feel free to change as you feel necessary.
10. The Tools Tab should generally be setup as follows:
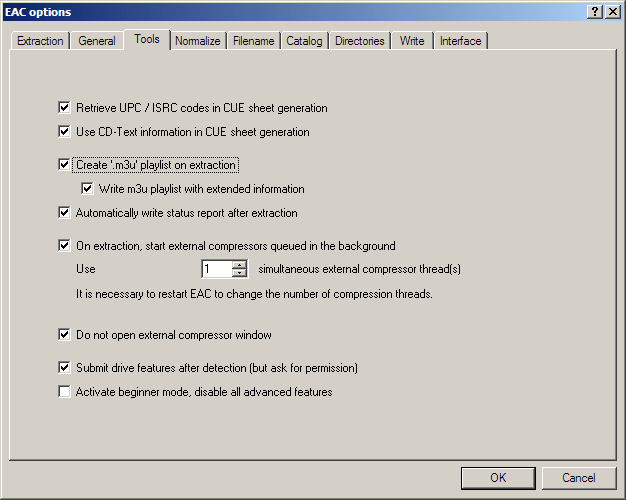
You can turn .m3u playlist creation off if you wish. Also Submit drive features after detection can be turned off if you wish.
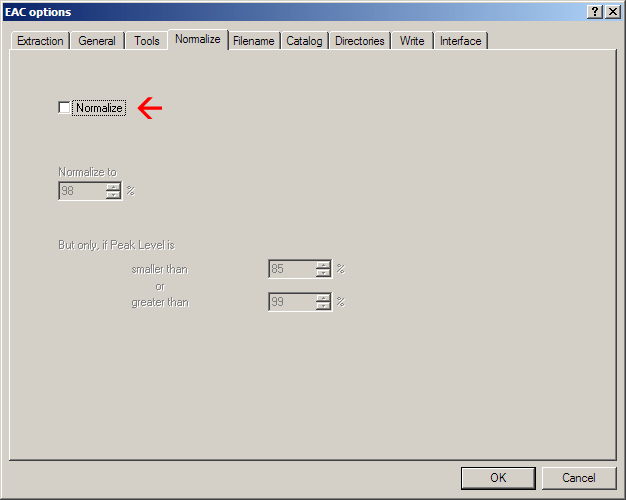
11. On the Normalize tab you most definitely want Normalization Off. So your setup should look like this:
12. The Filename Tab is another tab that is left up to the user to determine their ideal setup. I use the following but you can use whatever suits you:
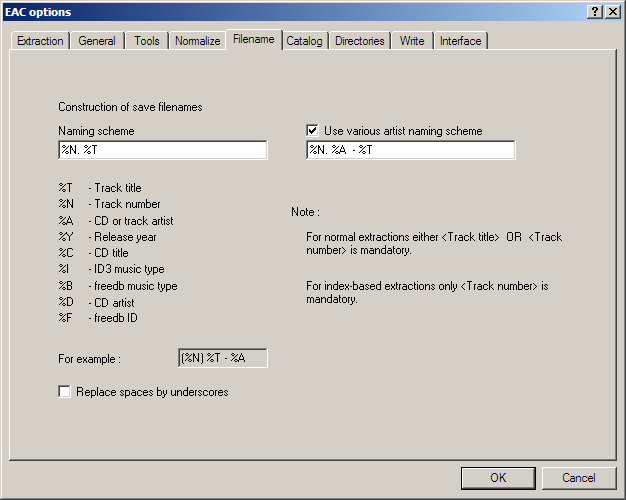
The setup above will produce filenames like:
1. Track Title
Or for a Various Artists album:
1. Artist - Track Title
You can also specify a directory structure. For instance, this would create artist and album directories as needed:
%A\%C\%N. %T
13. Don’t worry about the Catalog Tab, it shouldn’t affect your rips.
14. The Directories Tab is user definable, I use the Ask Every Time option
15. The Write Tab doesn’t affect ripping so I won’t cover it here
16. The Interface tab typically doesn’t need changing. If you are having problems ripping, getting ASPI errors or EAC can’t see your drive, try copying Nero’s wnaspi32.dll into the EAC directory, restart EAC and select Installed External ASPI interface option. Once you’re done click OK to save the changes.
17. Go back to the EAC Menu and select Drive Options and click on the Extraction Method tab. Its extremely important that this tab is setup correctly:
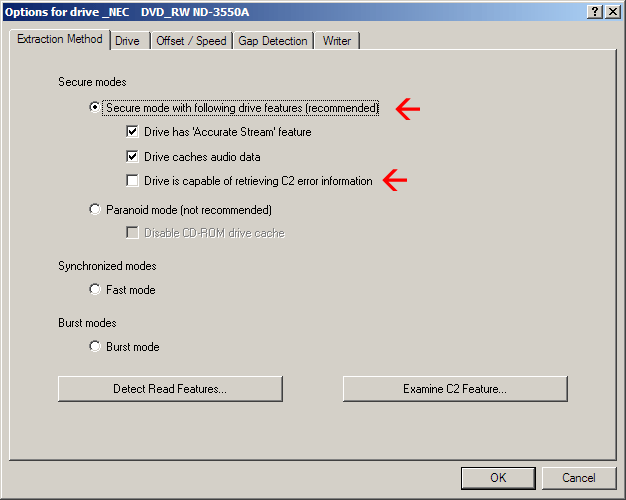
You can select the Detect Read Features button and run the test with an Audio CD in your drive. Once completed ensure that Secure Mode is selected (very important) and also that Drive is capable of retrieving C2 error information is Off. C2 Error correction can sometimes introduce errors of its own while trying to correct for disc errors… if you are having problems ripping a particular CD, try turning this on and re-ripping… however, its recommended that you listen to the tracks afterwards to ensure that there are no audible errors.
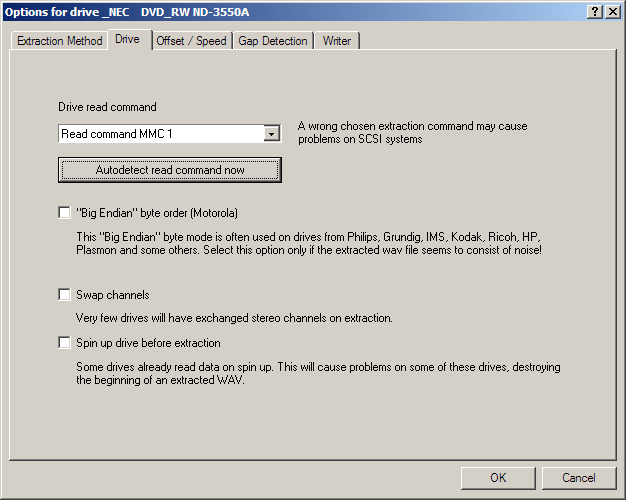
18. On the Drive Tab, select Autodetect read command now which populates the Drive Read Command drop-down. Everything else should be off:
19. The Offset / Speed tab should have some options greyed out if you have completely setup AccurateRip. Make sure that Allow Speed Reduction during extraction is checked and for most newer drives you can check CD-Text Read capable. If you encounter errors on every track or are having problems getting AccurateRip to work, try the "Overread into Lead-In and Lead-Out" option.
20. The Gap Detection tab isn’t necessary since we are ripping to separate tracks.
21. The Writer tab doesn’t affect ripping.
22. Click OK to save your changes.
23. Go back to the EAC Menu and select Compression Options and click on the External Compression tab and select the following options:
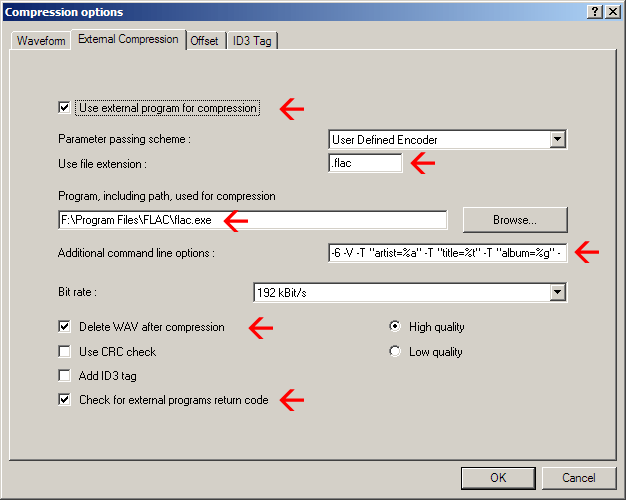
On the Additional command line options textbox you want to enter:
-6 -V --replay-gain -T "artist=%a" -T "title=%t" -T "album=%g" -T "date=%y" -T "tracknumber=%n" -T "genre=%m" -T "comment=EAC (Secure Mode)" %s
This will use a compression setting of 6 for FLAC which is best for the majority of tracks. You can change the comment field to whatever you like.
Make sure you point to flac.exe here, not the FLAC front-end GUI if you've chosen to install it.
24. You don’t want to touch anything on either the Offset or the ID3 Tag tabs.
NOTE: If you do not leave the Use offset correction for encoding and decoding UNCHECKED in the Offset tab in Compression Options, you will not obtain gapless FLAC files.
25. Click OK to save your changes.
26. I suggest you now save all of your settings in a profile. Profiles allow you to do different setups (say for different drives or for different codecs) without having to go in and change all of your settings. To do so, look at the bottom of the main EAC screen and click the New button:

27. Enter a name for the profile, say Secure FLAC and select All EAC Options.
28. You may wish to create a profile for MP3 ripping, say to a portable device. Consult the Quick Guide here. The guide is fairly current except for the LAME MP3 encoder settings. See here for the current recommended settings.
Congratulations you have completely setup EAC for ripping! You’ll never have to do any of this again!
Your next step should be to begin ripping using Beginners guide to ripping with EAC.
EAC Ripping
Beginners guide to installing EAC -
Beginners guide to EAC -
EAC Ripping In Depth
Beginners guide (overview)
Connecting speakers -
Networks -
Wireless network problems part 1 -
part 2 -
File formats -
Ripping -
EAC (install) -
Tagging -
Organising -
Servers -
Backup -
Classical -
iTunes